One of the fun things about working with Microsoft products nowadays is the frequency in which they release new features and applications. It’s definitely true when it comes to Azure. Almost every week there’s a new blog or how-to which we can learn something unique from.
One of the new offerings in Azure is Azure Machine Learning. Cloud-based, it lets you build, deploy and share advanced analytics. Which got me thinking (dangerous I know!). Having played around little more with Azure recently I wanted to find a way of leveraging it further in SharePoint or Office 365.
Create your own neural networks with Azure Machine Learning
First of all I thought about machine learning. While computers are undoubtedly complex (any coder or dev will agree), they are also quite basic. They only do what we tell them. Unlike most of us they don’t learn from their mistakes. The idea behind machine learning is that they become more intelligent and learn from previous information by adapting the output, based on data and a configured neural network. For example, machine learning is being used in search engines. The more people click on a certain result, the higher that particular item is ranked in subsequent queries.
Machine learning uses a configured neural network to be able to train itself, learn from previous data, and generate an output. Previously difficult to set up and only achievable if you were highly trained, Azure Machine Learning is available to a much wider audience.
For all of us this is great. As you can now leverage one of the many available Azure Machine Learning API’s in your apps. One of which is the Text Analytics API, which is what I want to look at today.
Putting Text Analytics to work in SharePoint
The Text Analytics API, part of Microsoft Azure Machine Learning platform, allows devs to submit text to the Text Analytics API. The API then analyzes this text, and is able to perform sentiment analysis, or keyword extraction. For example, it is able to determine whether a sentence like “Azure Machine Learning is a very powerful tool” is positive or negative. Pretty cool!
In this post I’m going to look at keyword extraction. I thought it would be really useful to integrate this with SharePoint in the following scenario:
Every time a user saves a content page (for example on the Intranet), the Text Analytics API is used to extract all the keywords from this page, and saves it to a different field in the content page. This information can then be used for automatic tagging, tag clouds, and generally improving the search experience.
This sort of application could be taken even further, especially when the API gets more advanced. Not only could keywords be analyzed, but also sentiment, tone and maybe even quality. The sort of application I will describe in this post could form part of an automatic ‘quality’ assessment for Intranet content. Goodbye to poor content or inappropriate messages, the app could scan for problems in advance. This sort of stuff has previously only been available in very specialist environments or for a lot of money. Now it could be part of your SharePoint environment! Let’s get started.
Sign up for Text Analytics API
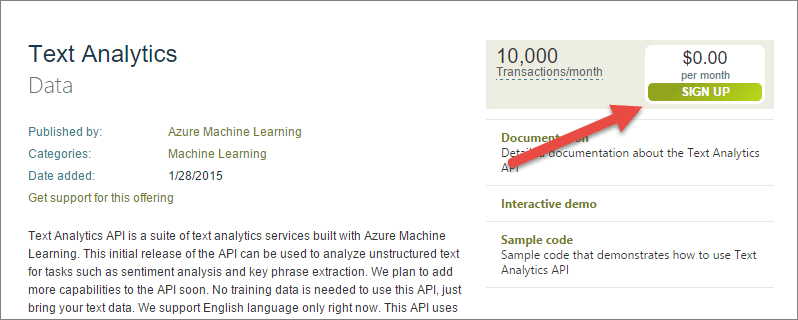
To get going, the first step is to sign up for the Text Analytics API via the Azure Marketplace. The API is free for up to 10k transactions / month. Click the “Sign up” button to continue.
Fill in the form and accept the terms & conditions.
Next, probably because of a glitch in my browser (shouldn’t use Edge I guess 😉 ), I had to click “Sign up” again and again accept terms & conditions. Eventually it should show this under My Account -> My Data:
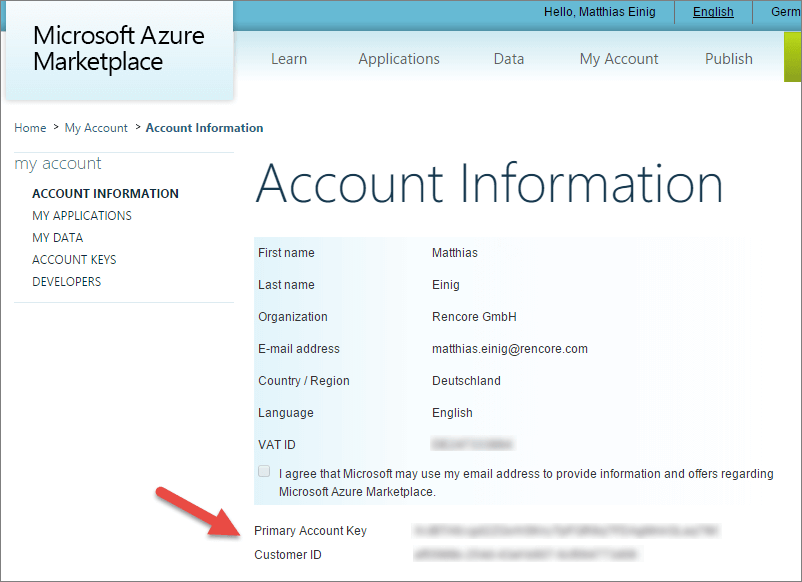
The next step is to copy your primary account key somewhere safe. Click “My account” in the header:
Copy the primary account key. You’ll need it later!
Create the SharePoint Provider Hosted App
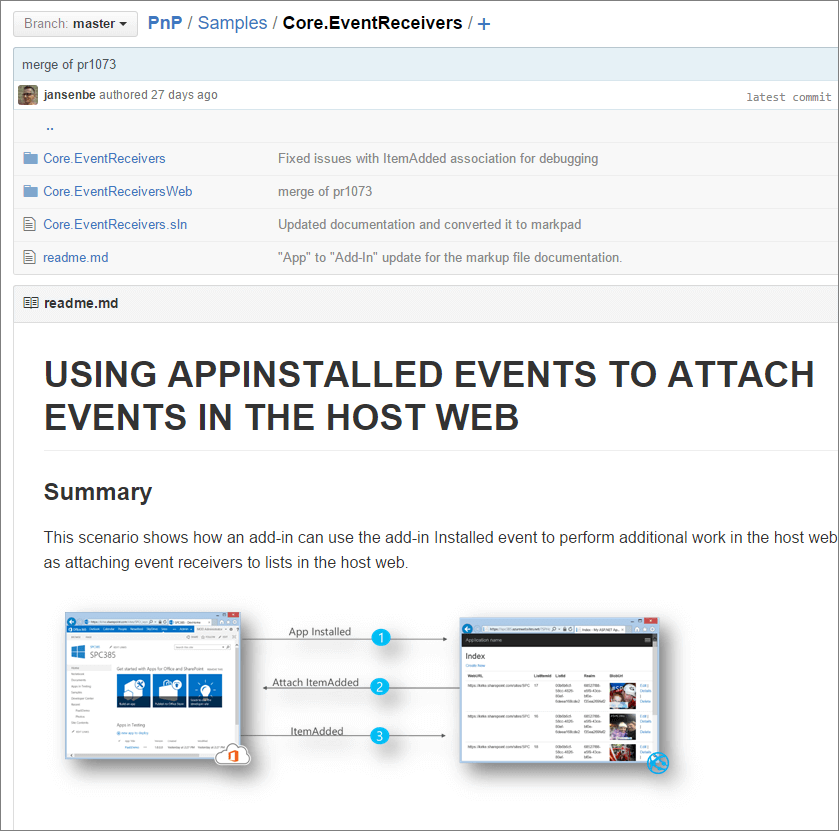
Now I am going to create a provider hosted app which registers a remote event receiver in the host web, not in the app web. Registering a remote event receiver in the host web cannot be done declarative, it must be done in code. To get started, I use this excellent OfficeDevPNP sample from Vesa Juvonen and Kirk Evans (both Microsoft).
To be able to debug a remote event receiver, an Azure Service Bus must be registered first. Refer to TechNet for the full explanation how to do this, but essentially you need to do two things:
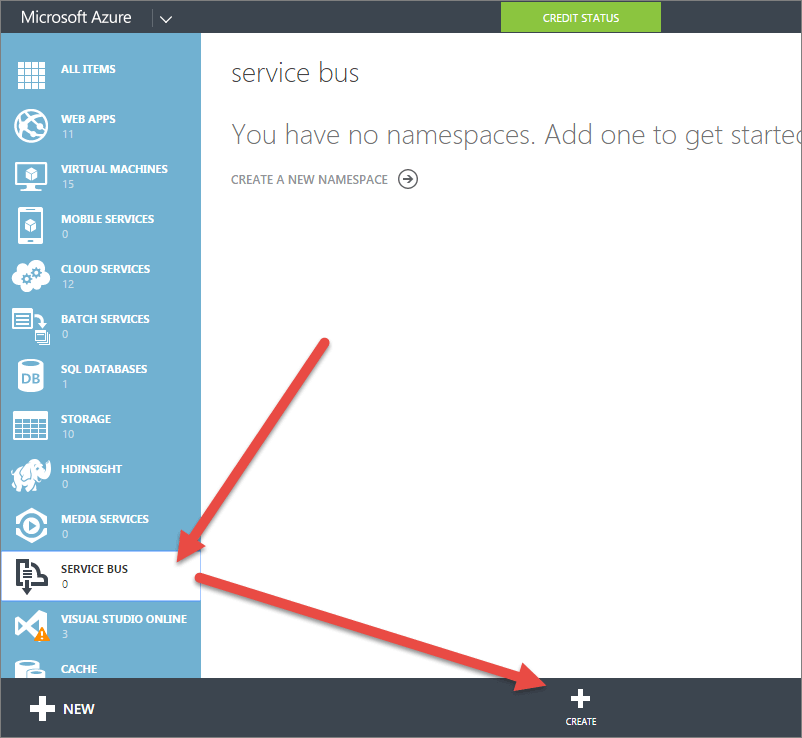
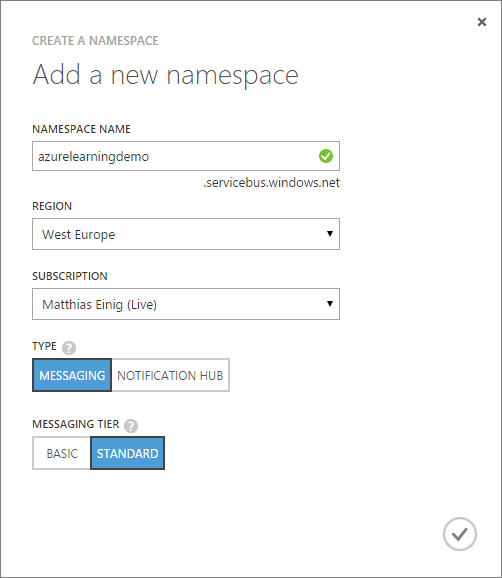
1. Go to the Azure Management Portal and click on “Service Bus” on the lefthand side.
Click + in the footer to create a new Service Bus.
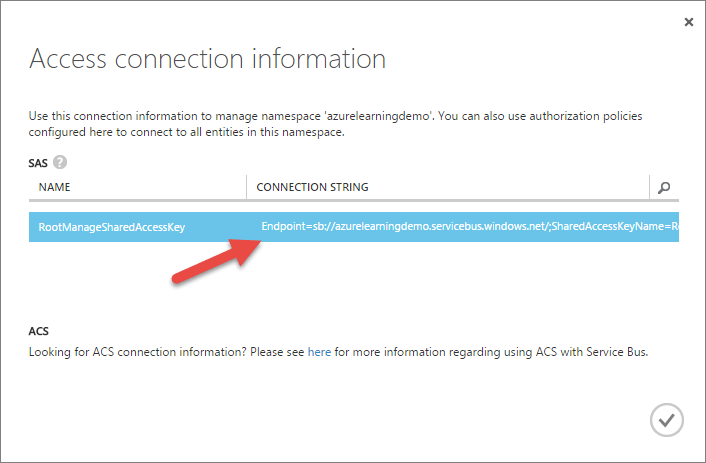
2. Click “Connection Information” and copy the Connection String.
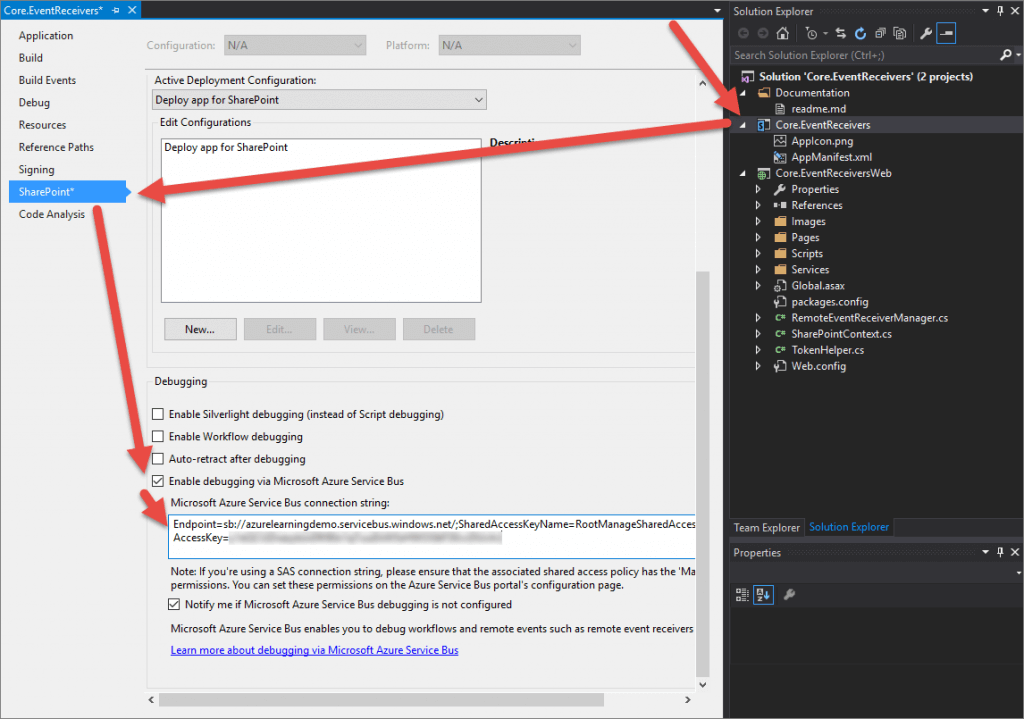
Paste this in the project properties of the Core.EventReceivers SharePoint add-in project-> SharePoint in Visual Studio.
A service bus is only required for debugging purposes, for the reason that Office 365 cannot access your debugging environment directly, as that most likely will be running on your localhost. So, Microsoft has come up with this smart way of leveraging Azure Service Bus as in fact the man in the middle.
To focus on the Azure Text Analytics code, I leave the code in the OfficeDev.PnP sample to set up a remote event receiver for the ItemAdded event in a newly created list. Though I don’t like the title “Remote Event Receiver Jobs”, so let’s change that to “Text Analytics Demo” first. Change the following line in RemoteEventReceiverManager.cs:
private const string LIST_TITLE = "Remote Event Receiver Jobs";
to
private const string LIST_TITLE = "Text Analytics Demo";
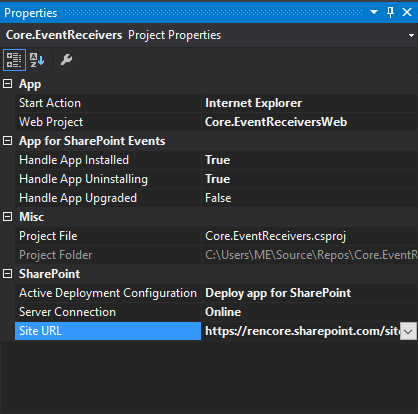
I also need to set the URL to my Office365 developer tenant. Select the SharePoint add-in project and configure the Site URL under SharePoint:
At the end I give the app also a nicer name in the AppManifest.xml 🙂
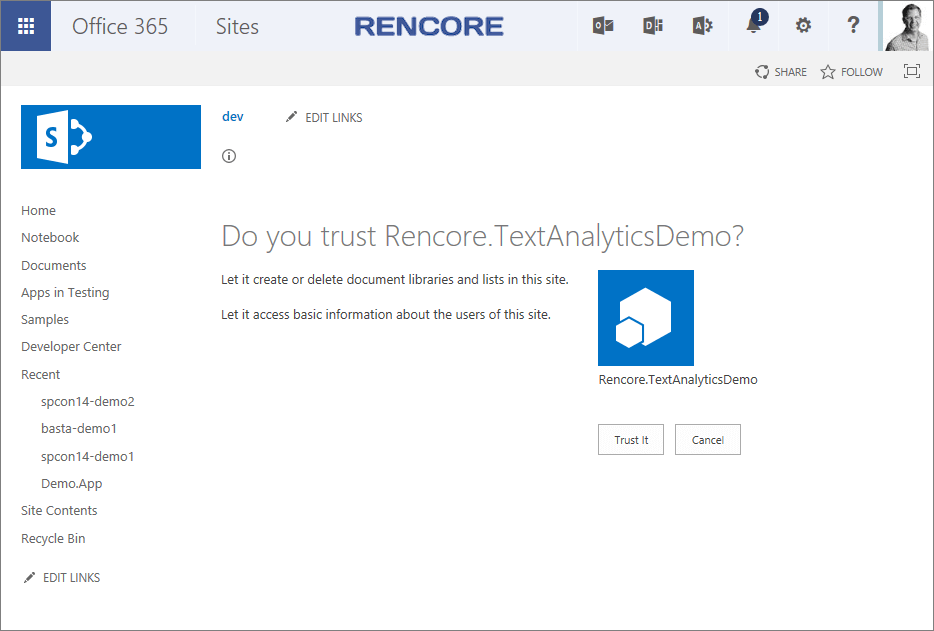
This should now be good to go! Let’s see that it works, hit F5, and wait for the Trust window to pop up.
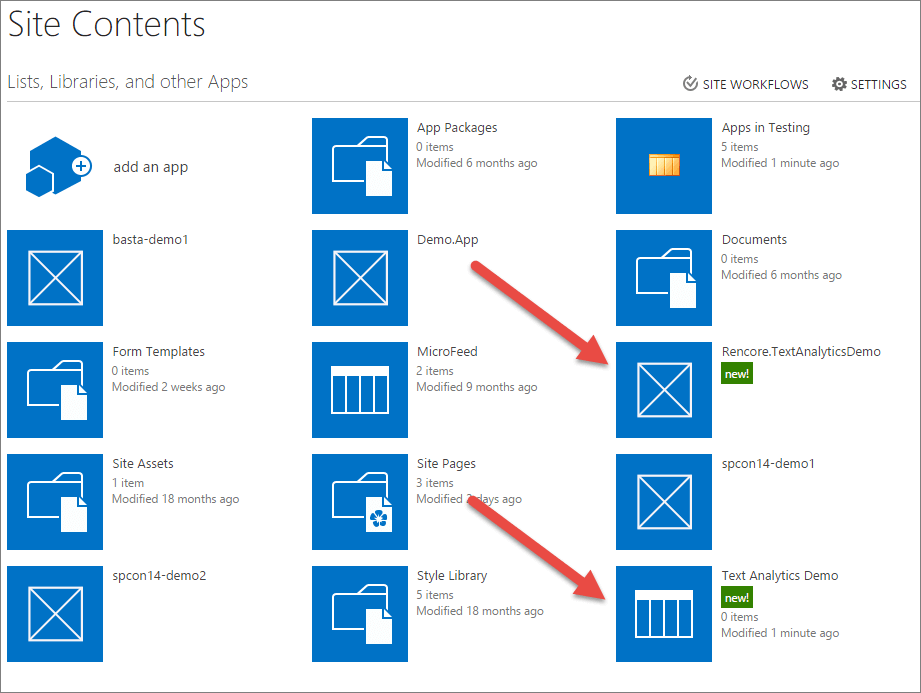
Click “Trust it” to trust the app and continue. After the app has been installed (this may take a minute or so), open your SharePoint site and verify the list has been created.
Also, make sure you are logged into your developer tenant in your default browser, Chrome in my case. Otherwise it does not work properly either.
The next thing is to change the code in the ItemAdded event receiver.
Go to RemoteEventReceiverManager.cs and add the following usings
using System.Net;
using System.Runtime.Serialization.Json;
Then replace method ItemAddedToListEventHandler with the following. I’ll add the Text Analytics API magic here.
public void ItemAddedToListEventHandler(ClientContext clientContext, Guid listId, int listItemId)
{
    // paste your primary account key from text analytics here
    string authorizationKey = "<text analytics primary account key>";
    try
    {
        // get the item that has been added to the list
        List list = clientContext.Web.Lists.GetById(listId);
        ListItem item = list.GetItemById(listItemId);

        clientContext.Load(item);
        clientContext.ExecuteQuery();

        // build up query to text analytics and pass the list item's title to it
        var url = string.Format("https://api.datamarket.azure.com/data.ashx/amla/text-analytics/v1/GetKeyPhrases?text={0}", HttpUtility.UrlEncode(item["Title"].ToString()));
        var request = (HttpWebRequest)WebRequest.Create(url);

        var plainTextBytes = System.Text.Encoding.UTF8.GetBytes(string.Format("AccountKey:{0}", authorizationKey));
        request.Headers.Add("Authorization", string.Format("Basic {0}", Convert.ToBase64String(plainTextBytes)));
        request.Accept = "application/json";

        // get the response from text analytics and add it to the description of the list item
        WebResponse response = request.GetResponse();
        DataContractJsonSerializer jsonSerializer = new DataContractJsonSerializer(typeof(KeyPhrasesJsonObject));
        var keyPhrases = (KeyPhrasesJsonObject)jsonSerializer.ReadObject(response.GetResponseStream());
        item["Description"] = String.Join(", ", keyPhrases.KeyPhrases.ToArray());
        item.Update();
        clientContext.ExecuteQuery();
    }
    catch (Exception oops)
    {
        System.Diagnostics.Trace.WriteLine(oops.Message);
    }
}

public class KeyPhrasesJsonObject
{
     public List<string> KeyPhrases { get; set; }
}
Make sure to paste your text analytics primary account key that we copied at the very beginning into the authorizationKey variable in line 4.
Then on your dev site, delete the “Text Analytics Demo” list from your site before continuing. When debugging, event receivers are not cleaned up after stopping debugging. An easy fix in our case is to just delete the list. Re-install the app by hitting F5, and go to the list to see Azure Text Analytics API in action!
Add a new item, and enter as Title “SPCAF analyses SharePoint farm solutions, addins, executables and assemblies and checks .NET Code, JavaScript, XML, ASPX, and CSS for correctness, best practices, security, performance etc.” (some subliminal product placement here 😉 )
After hitting save, the description field should have the keywords now:
In the same way as I have done here an event receiver could run when a page of content is saved, and the keywords stored in a list somewhere. A ‘tag cloud’ app part could then be configured to display these words on the page somewhere.
You can download the source code of this sample from my GitHub account.
Easily automate text analysis
What I’ve shown today is that with remote event receivers you can enrich your SharePoint data with the Azure Text Analytics API, by extracting keywords. There’s a ton of other ways to play with and maximize the available Azure Machine Learning APIs. One idea might be to use the sentiment analysis, which could analyze whether a user’s input is positive or negative. The API would be leveraged through a workflow instead of a remote event receiver. That’s one I might look at in the future!
Enjoy 🙂


