

In the first article in a series on Microsoft Viva, we explored the purpose of Microsoft Viva and answered the question ‘What is Microsoft Viva?’ In this article, we’ll look deeper into the governance and administration of Microsoft Viva tools.
Microsoft Viva tools operate across Microsoft 365 workloads. As such, administrative access can be challenging as access across the tenant is needed, yet we still need to consider the principle of least privilege as part of security best practice.
Administrator Roles for Microsoft Viva
As with most Microsoft 365 apps, initial configuration of Microsoft Viva within a tenant mostly relies on the Global Administrator role. With the majority of the Viva Tools being accessed via Microsoft Teams, there is also a heavy reliance on the Teams Administrator role for app deployment. However, there are additional workload and dedicated Administrator roles which can be used for the configuration and management of Microsoft Viva.
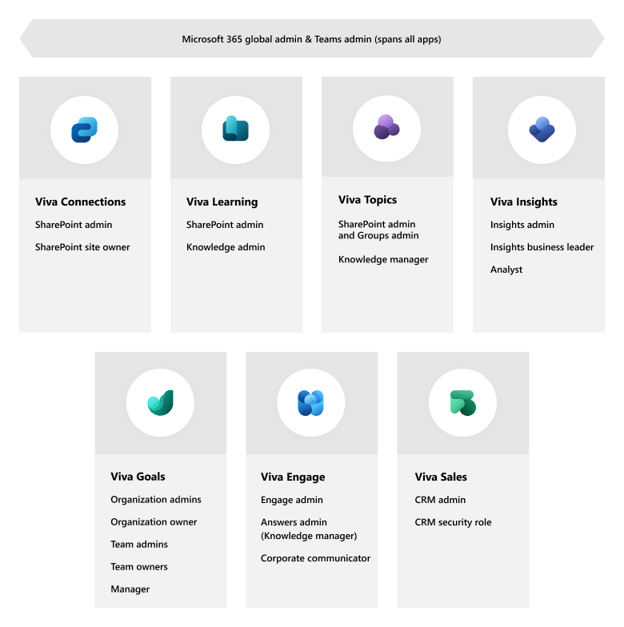
The global Administrator role is specifically needed to assign other Administrator roles and also to deploy and install the Viva Sales add-in for Outlook. All other configuration of Microsoft Viva can be undertaken by administrators with other roles assigned.
Licensing
When working with Microsoft 365 licences, it is possible to enable or disable features and apps. This is also true for Microsoft Viva. So even if licences are available, the Viva apps themselves may be enabled or disabled in the licensing controls.
Configuring Tenant Level Settings for Microsoft Viva
Generally speaking, to set up Viva, you start with Viva Administrator page to find set up guidance then do config per app. Additional guidance is also available from MS Learn documentation:
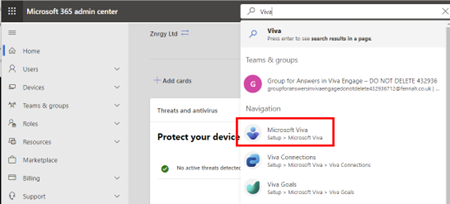
There is no dedicated Viva Administrator centre, but by searching in the M365 Administrator Center, you can find the Viva set up page. This Microsoft Viva set up page will help guide you through the configuration steps including granting appropriate permissions and roles. These are summarized below.
Viva Connections
As Viva Connections is included in all the Microsoft and Office 365 plans which include SharePoint Online, there are no additional licensing requirements. To implement Viva Connections, you need to:
- Have an intranet in SharePoint
- Working as a SharePoint Administrator declare a “Home Site” and choose the default landing page experience for your users.
- Working as the site owner of the Home site, set up SharePoint Global Navigation
- Working as the Teams Administrator, deploy the Viva Connections App into Teams for your users (via Teams Administrator Center)
Viva Engage
To implement Viva Engage you need to:
- As a Global Admin, assign Yammer and Viva Engage licences
- Using the Yammer Administrator role, configure your Yammer network & communities (optional)
- As a Teams Admin, configure the Viva Engage Teams App incl any customisation of icon, app name, and description.
- As a Teams Admin, deploy & manage app via Teams.
Note that Viva Engage can also be via web portal. The web portal may still be called Yammer as the rename is rolling out at the time of writing this article.
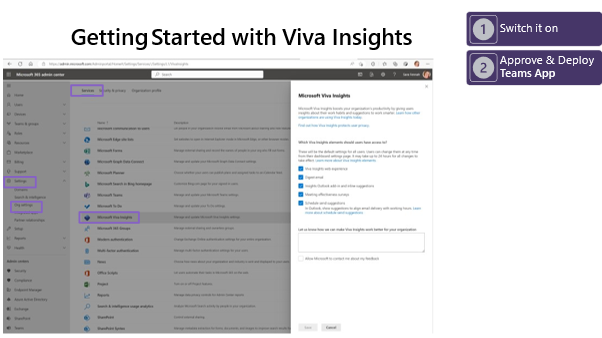
Viva Insights
The personal productivity and wellbeing insights provided by Viva Insights are primarily all features which are included in the seeded Microsoft 365 content and simply require a Global Administrator or Insight Administrator to enable the features at tenant level and then a Teams Administrator to deploy the app into Microsoft Teams.
It is also possible to configure Viva Insights at the user level using PowerShell with Exchange Online PowerShell v2.
Viva Teams & Org Insights
The Viva Insights Teams and Org level insights in the Viva Insights Microsoft Teams app are unlocked with premium license and subject to a minimum number of measured users. A measured user is one who is assigned a Viva Insights license and has not opted out of organisational level Viva Insights.
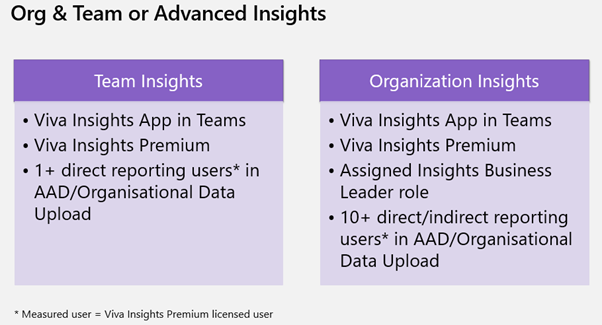
Team insights are visible to users with Viva Insight premium and more than 1 direct report as defined by the manager field in AAD or in the Organizational Data Upload covered in Advanced Insights.
Organization Insights are visible to users with Viva Insight premium, assigned the Business Insights Leader role or set as a group manager in Viva Insights plus have more than 10 direct and/or indirect reports.
Advanced Viva Insights
The advanced insight app for teams and organization level insights is available when you have a minimum of 10 Viva Insights licences users in your tenant. You need to wait 5 days after assigning licences to users for the system to gather data before you can start running queries.
You need at least one Analyst and one Insights Administrator to configure and manage advanced insights. The Global Administrator is automatically given equivalent rights as an Insights Administrator. Read more on roles in Advanced Insights here.
Viva Insights uses your Azure AD data by default. Whilst this data automatically feeds into Viva Insights and you don’t need to do anything extra to set up organizational data in the advanced insights app, the Azure AD data is best augmented with additional data such as hire date which can be added via CSV upload. For information on preparing and uploading organisational data, see Prepare an organizational data file upload | Microsoft Learn
Note: Details on the first upload process and ongoing updates are available on Microsoft documentation.
Optional settings can also be configured and include
Privacy Settings
- Increase min group size from default of 10
- Allow users to opt out using end user opt-out settings
- Unhide meeting and email subjects in results
Manager Settings
- Enable/disable Insights for team managers
- Upload list of managers
- Increase min team size from default of 10
Additional information are available on optional settings and manager settings. Also on Microsoft Learn is an overview of the set up for advanced insights.
Viva Goals
Viva Goals can be managed in the Teams App or the web portal. At time of writing, full functionality is only available via the web portal and so that should be used for set-up out of preference.
Once a Viva Goals licensed user with Global Administrator or Goals Administrator permissions accesses the tool for the first time, they are prompted to create an organization. Every tenant can have multiple Viva Goals organizations or just one. Each organization in Viva Goals has its own Administrator dashboard and members.
Connection
Employees have a strong connection to an organisation, when they are kept up to date and informed about organisational values, initiatives, changes and news. Employees feel part of the organisation when they are well informed and connected to the day-to-day happenings as well as the big issues. That feeling of connection translates into stronger teamwork and engagement in driving towards the core objectives of the organisation.
To get started:
- Assign Licences
- Create your first Viva Goals organization
- Configure the options for the org via Administrator dashboard and tenant level settings via the Viva Goals Administrator portal
- Deploy the Viva Goals app in Teams
Viva Goals integrations offer ability to link to other systems to track progress on your OKRs. The available integrations are controlled centrally via the Viva Goals Administrator portal and also on each organization via the Administrator dashboard. Read more about integrations in the documentation on Microsoft Learn.
Viva Learning
Viva Learning supports integration of custom content from SharePoint in both the seeded and premium versions.
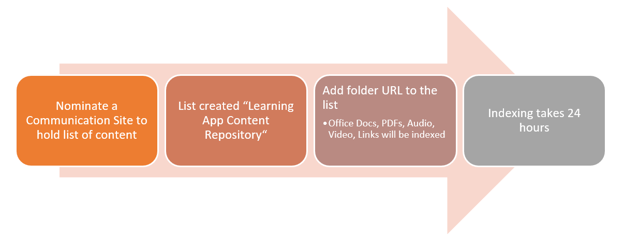
Step 1: We recommend you start by creating or choosing a SharePoint site for the curation of learning resources. This must be a communication site. You do not need to store all of your learning resources in that SharePoint site. As permissions to access the content via Viva Learning must be controlled by Microsoft 365 Groups a communication site may not be best place to store the content.
Step 2: Viva Learning is a product with seeded content – so no licence needs to be assigned for set up. You must assign Administrator rights to the user who will be setting up Viva Learning (either Global Administrator or Knowledge Admin) and if your organisation intends to use Viva Learning premium features they will need the appropriate license assigned. That Administrator can then access Microsoft 365 Administrator Center and use the Viva Learning settings to configure resources and initial options.
Step 3: Add custom learning resources into the SharePoint resources list. This is done by adding a link to the learning resource to the list. A user with edit or contribute access to the list can make these changes, an Administrator role is not required. The learning resource can be a folder or individual file, though folders are preferred. The location added will be indexed over next 24h and Office documents, PDFs, audio & video files in the location are added to Viva Learning.
When adding custom learning resources to Viva Learning it is important to consider the permissions on the content. This controls what users can access in Viva Learning. Permissions to the content must be granted using Microsoft 365 Groups only. User access to indexed content is controlled as follows:
- All users can see indexed content in the catalogue and search within Viva Learning
- Users can only open and access the content from the catalogue if they have permissions to read or edit the content
Step 4: Working as a Teams Administrator, approve and deploy the app from Teams Administrator Center
Step 5: In the Viva Learning app in Microsoft Teams, choose … Settings and configure options for you as a user. You will need to also advise users to do this if you have a business subscription to LinkedIn Learning so they can sign into their LinkedIn Learning account to activate access to the resources via Viva Learning.
Step 6: With premium Viva Learning licences the Administrator tab is unlocked within the Teams app and available to a user who has Viva Learning Premium and Knowledge Administrator or Global Administrator role. In this case the final step is to review the additional settings in the app.
Viva Topics
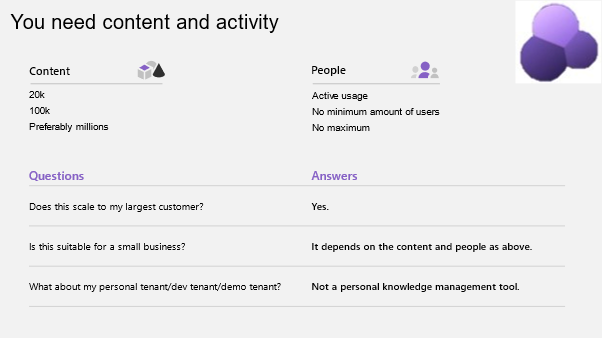
Viva Topics is not suitable for all organisations, there is a minimum amount of data and activity that you need before it can work as designed. It is important that the content is actively used and that new content on topics is actively created. This activity is more important when considering if Viva Topics is appropriate for your organisation than the actual numbers of items.
The config is relatively simple:
1. Working as a Global Administrator assign roles & licences
2. Working as a Global Administrator or Knowledge Administrator follow the set up wizard to configure the options
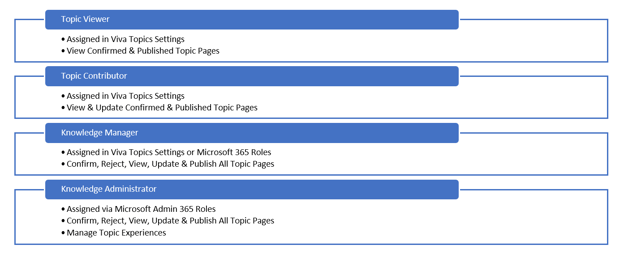
- In Topic Visibility choose who can view Viva Topics (This assigns the Topic Viewer permissions to chosen users. They will also need a Viva Topics license)
- In Topic Permissions choose who can create and edit Topics (This assigns the Topic Contributor permissions to chosen users. They will also need a Viva Topics license)
- In Topic Permissions choose who can manage Topics (This assigns the Knowledge Manager permissions to chosen users. They will also need a Viva Topics license)
- In Topic Discovery choose which SharePoint sites will be searched for topics. You can exclude sites, exclude topics by name or by assigned sensitivity labels and exclude people from being suggested on a topic.
- Nominate a SharePoint site to be the Topic Center
3. Wait a minimum of 24 hours but probably more in the order of 5-10 days for the AI to start suggesting topics
4. Work with subject matter experts to review suggested topics and curate the pages
5. Publish curated and approved pages.
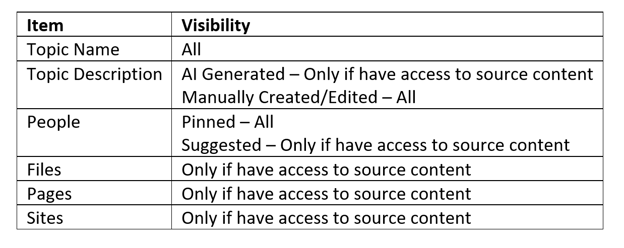
Viva Topics generally follows the SharePoint permissions assigned to the items to control visibility of information. However, there are some areas where this is not the case. The following table summarises topic page component visibility.
Users need a Viva Topics license and role assigned to interact with Viva Topics, both in the Topic Center and in the flow of work.
Viva Sales
Viva Sales predominantly falls under the control of the Dynamics 365 Administration. From the Microsoft 365 administration perspective, the only thing we need to do is enable the app through the settings in services. For more details, please review the Viva Sales deployment guide for Dynamics 365 customers and Viva Sales deployment guide for Salesforce CRM customers.
Viva Pulse
Viva Pulse is included in the Viva Suite license, users also need an active Microsoft Forms license to create and send Pulse surveys. Microsoft Forms is part of Office 365 and should be available unless it has been purposely disabled.
To implement Viva Pulse you need to:
- As a Global Admin, assign Viva Suite and Microsoft Forms licences, including to the admin who will carry out the set up.
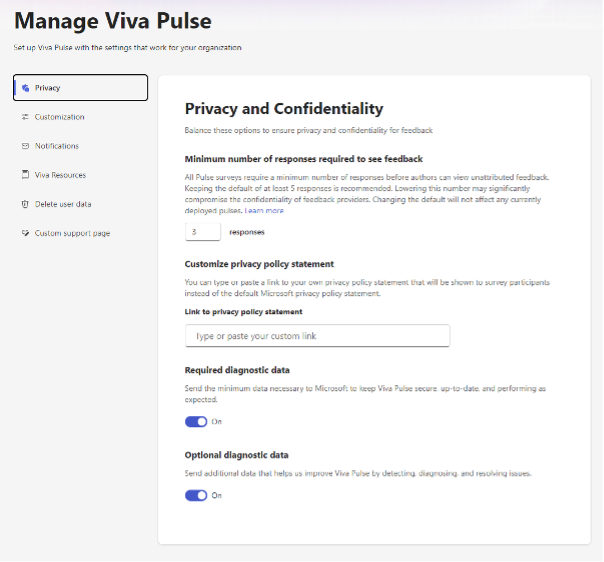
- Using the Global Admin or Viva Pulse Admin role, navigate to https://pulse.viva.cloud.microsoft/ and select Manage and work through the available options. Changes on the manage page are saved automatically.
- Under Privacy, the default number of responses is set to 5, but can be increased or reduced as far as 3.
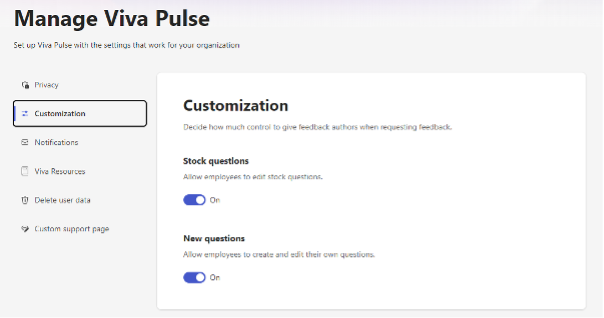
- Customization settings allows you to block or permit users to edit stock questions or create custom questions. If both are disabled only standard stock questions will be available.
- Under Notifications, choose if users can subscribe to updates from Viva Pulse via email or not.
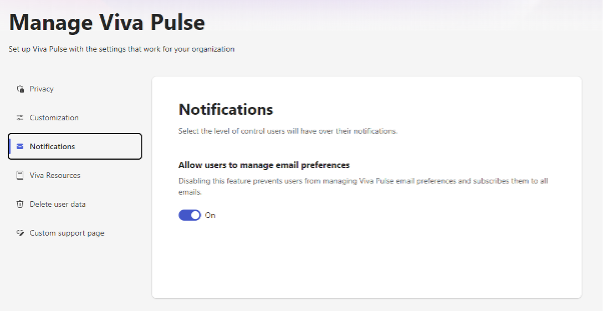
- Once email notifications for Viva Pulse are enabled here you will also need to grant permissions for Pulse to access your directory. See documentation on Microsoft Learn for details of granting the app required permissions via PowerShell.
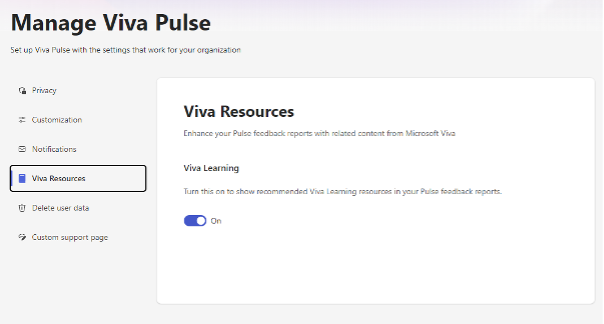
- Under Viva resources choose to make Viva Learning materials available in results to support staff development.
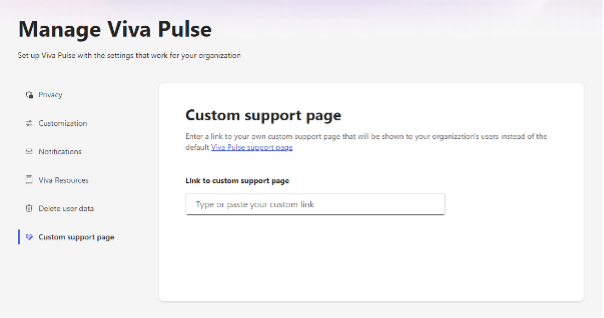
- Under Custom Support page add your own user support page if you do not wish users to see the default page on the Microsoft Support site
- As a Teams Admin, deploy & manage app via Teams
It's great to see delete user data option in here too. I can see many scenarios where it will be necessary to delete user data. For example during a pilot, people will be contributing to surveys and it may be inappropriate to keep the results, as they are likely to be dummy responses and not helpful for tend analytics later.
Customization and Deployment of Microsoft Viva Apps in Microsoft Teams
Viva Home is available as part of Viva Connections and provides links to the apps as an alternative to deploying the individual apps from user standpoint. However, the users must still be authorised via the Teams App Permission Policy to use the app to be to navigate them from Viva Home.
To Set up the Apps
Working in the Teams Admin Center as a Teams Administrator.
- Navigate to Teams Apps -> Manage Apps to authorise the apps at tenant level and access customisation settings
- Navigate to Teams Apps -> Permission policies to ensure the apps are added to the appropriate app permissions policies to grant users access to them in Microsoft Teams
- Navigate to Teams Apps -> Setup policies to install for users using set up policies
A note from Rencore
If you’re interested in more ways to understand your Microsoft 365 environment and improve productivity within it, feel free to look at Rencore Governance. The governance tool centralizes all Microsoft 365 service data – including Viva Engage – into one place and automates policy and lifecycle processes for complete governance and data understanding.